Tutorial Adobe Photoshop Komplit
Foto-foto artis seperti Sandra Dewi & Nia Ramadhani, yang banyak beredar di Internet dibuat dengan Adobe Phostoshop. Hasil gambar olahan Adobe Photoshop ini juga banyak dilihat di berbagai website, brosur, koran, majalah, dan media lainnya. Adobe Photoshop adalah software pengolah gambar yang sangat powerfull dengan segala fasilitasnya. Saat ini Adobe telah mengeluarkan Adobe Photoshop CS5 yang lebih powerfull. Versi sebelumnya, yaitu Adobe Photoshop CS2, Adobe Photoshop CS, dan Adobe Photoshop 7, masih sering dipakai untuk komputer lama (pentium 3 ke bawah). Tutorial Adobe Photoshop ini dibagi dalam 6 Bab.
BAB I – MENGENAL ADOBE PHOTOSHOP
1.1. Apa itu Adobe Photoshop?
Adobe Photoshop adalah software pengolah gambar yang sangat powerfull dengan segala fasilitasnya. Hasil gambar olah dengan Adobe Photoshop ini banyak dilihat di berbagai website, brosur, koran, majalah, dan media lainnya. Untuk download Adobe Photoshop klik di sini.
1.2. Mengenal Area Kerja
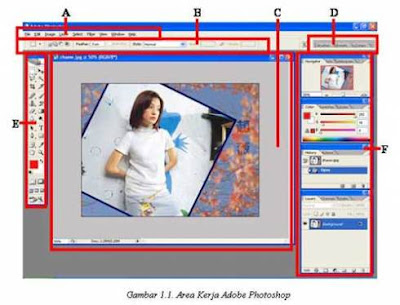
Jalankan Adobe Photoshop kemudian pilih menu File -> Open. Kemudian pilih buka gambar apa saja. Sebagai contoh di buka gambar zhaow.jpg yang ada pada CD Tutorial bagian BAB I (lihat gambar 1.1).
Seringkali letak tool-tool (palette) Adobe Photoshop sudah berubah dimodifikasi oleh pengguna sebelumnya. Untuk mengembalikan letak palette ini gunakan menu Windows -> Workspace -> Reset Palette Location.
Area kerja Adobe Photoshop dapat dilihat pada gambar 1.1, yaitu:
A : Menu Bar, berisi perintah utama untuk membuka file, save, mengubah ukuran gambar, filter dan lain-lain.
B : Option, berisi pilihan dari tool yang Anda pilih. Misalnya dipilih kuas/brush, maka ukuran/diameter brush ada di sini.
C : Gambar, menampilkan gambar yang sedang dibuat atau diedit.
D : Pallete Well, cara cepat untuk mengakses palet brushes, tool resets dan Layer Comps. Juga dapat digunakan untuk meletakkan palet yang sering digunakan.
E : Toolbox, berisi tool untuk menyeleksi dan memodifikasi gambar.
F : Palette, berisi jendela-jendela kecil yang di dalamnya terdapat perintah dan pilihan untuk dokumen/gambar yang sedang dikerjakan.
1.3. Praktek Bab 1
1.3.1. Membuka dokumen dan membuat duplikat dokumen
Untuk membuka gambar gunakan menu File -> Open, sedangkan untuk membuat duplikat gambar gunakan menu Image -> Duplicate.
1.3.2. Mengubah ukuran gambar dan kanvas
Jika ukuran gambar diubah, maka gambar akan membesar atau mengecil, lakukan dengan menu Image -> Image Size. Jika ukuran kanvas diubah, maka ukuran gambar tetap, akan ada kertas putih di sekeliling gambar, lakukan dengan menu Image -> Canvas Size.
1.3.3. Mencoba ToolBox
Cobalah tool-tool pada ToolBox, satu persatu akan dibahas pada bab berikutnya. Coba klik kanan pada tool yang memiliki segitiga di bagian kanan bawah untuk memilih tool yang tersembunyi.
1.3.4. Mencerminkan dan Memutar Gambar
Cobalah menu Image -> Rotate Canvas -> Flip Canvas Vertikal, Image -> Rotate Canvas -> Flip Canvas Horisontal. Untuk memutar gambar, pilih menu Image -> Rotate Canvas -> pilih sudut yang dikehendaki.
1.3.5. Undo
Undo digunakan untuk membatalkan perintah terakhir, tekan Alt+Ctrl+Z, atau gunakan pallete history.
1.3.6. Memindahkan gambar ke dokumen lain
Untuk memindahkan gambar gunakan Move Tool.
1.3.7. Save for web
Gunakan menu File -> Save for Web untuk menghasilkan gambar dengan ukuran kecil yang biasa digunakan pada web site.
BAB II – SELECTION & TOOL
2.1. Menyeleksi Gambar
Menyeleksi berarti memilih bagian tertentu dari
gambar. Dengan seleksi kita dapat mengcopy, mengubah, menggeser, atau
menambahkan efek kepada bagian yang terseleksi tanpa mempengaruhi bagian
lain.
Ada tiga cara menyeleksi yaitu:
- Marquee Tool, yaitu menyeleksi dalam bentuk kotak, elips, row, dan kolom
- Lasso Tool, untuk menyeleksi dalam bentuk bebas, poligonal atau kekontrasan gambar (Magnetic Lasso Tool).
- Magic Wand Tool, untuk menyeleksi berdasarkan persamaan warna.
Tipe seleksi ada dua (dapat dipilih pada Option Bar), yaitu:
- Normal, memiliki pinggiran yang tajam.
- Feather, memiliki pinggiran yang halus atau kabur.
2.2. Tool-tool yang lain
2.3. Praktek Bab II
2.3.1. Rectangular Marquee Tool
Gunakan rectangular marquee tool untuk memotong
gambar dalam bentuk kotak. Gunakan menu Select -> Transform Selection
untuk mengubah seleksi dan menu Select -> Feather untuk mengatur
ketajaman pinggiran potongan.
2.3.2. Elliptical Marquee Tool
Digunakan untuk membuat seleksi elips atau lingkaran.
Anda dapat menggunakan Select -> Transform Selection (atau klik
kanan) untuk mengubah bidang yang mau diseleksi. Gunakan menu Select
-> Feather untuk mengatur ketajaman tepi gambar. Gunakan Select ->
Inverse untuk membalik seleksi.
2.3.3. Lasso Tool
Seleksi ini digunakan untuk menyeleksi bentuk bebas dengan mouse.
2.3.4. Polygonal Lasso Tool
Polygonal Lasso Tool digunakan untuk menyeleksi
gambar yang memiliki tepi garis lurus, misalnya piramida pada gambar
2.5. Jika tombol Alt ditekan maka Polygonal Lasso Tool akan berfungsi
seperti Lasso Tool biasa. Contoh gambar hasil seleksi piramida
diperkecil dan diletakkan pada sudut kanan bawah.
2.3.5. Magnetic Lasso Tool
Magnetic Lasso Tool penggunaanya cukup mudah, karena
dengan tool ini seleksi gambar akan secara otomatis membuat garis
seleksi pada gambar yang berwarna kontras.
2.3.6. Magic Wand Tool
Magic wand tool akan menyeleksi gambar yang memiliki warna sama.
2.3.3. Crop Tool
Crop tool digunakan untuk menghilangkan bagian yang
tidak diseleksi. Contoh penggunaanya di sini digunakan untuk memperbaiki
hasil scan yang miring.
2.3.3. Healing Brush Tool
Healing Brush Tool digunakan untuk memperbaiki gambar
pada bagian tertentu. Aktifkan tool ini, kemudian tekan Alt + Klik pada
objek pada bagian yang tidak berkeriput, kemudian klik pada bagian yang
keriputnya ingin dihilangkan.
2.3.4. Spot Healing Brush Tool
Spot Healing Brush Tool digunakan untuk memperbaiki
kerusakan gambar. Di sini Anda tidak perlu menentukan area yang akan
digunakan sebagai patokan, karena akan secara otomatis terpilih dari
area di sekitarnya. Misalnya digunakan untuk menghilangkan keretakan
pada patung seperti pada gambar 2.10.
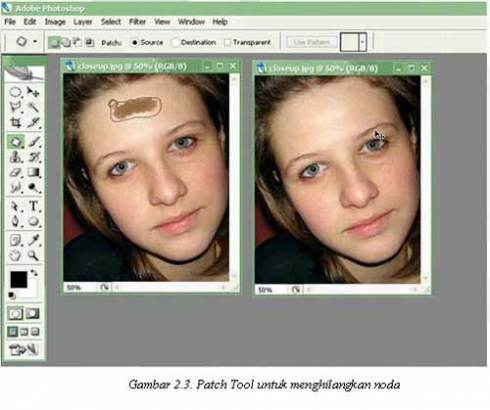
2.3.5. Patch Tool
Patch Tool digunakan untuk memperbaiki gambar. Tool
ini dibuat dengan cara membuat selection dengan mouse atau dengan
menahan tombol ALT untuk menghasilkan bentuk poligonal. Selanjutnya drag
ke daerah yang akan dijadikan patokan perbaikan.
2.3.6. Red Eye Tool
Red Eye Tool digunakan untuk memperbaiki warna merah pada mata.
2.3.7. Clone Stamp Tool
Clone Stamp Tool digunakan untuk membuat duplikat
area pada gambar, atau yang disebut cloning. Tekan ALT pada objek yang
akan dikloning, kemudian gunakan mouse pada area tempat objek baru mau
diletakkan.
2.3.8. Background Eraser Tool
Tool ini digunakan untuk menghapus background yang
memiliki kemiripan warna. Misalnya digunakan untuk menghapus background
langit pada gambar kupu-kupu.
2.3.9. Magic Eraser Tool
Seperti Background Eraser Tool, tool ini akan
menghapus area dengan warna sama, namun efeknya adalah ke seluruh
gambar, bukan hanya area yang diklik.
2.3.10. Color Replacement Tool
Color Replacement Tool akan mengubah warna gambar
tanpa mengubah bentuk dari gambar tersebut. Tool ini akan secara
otomatis hanya mengubah area dengan warna sama menjadi warna lain yang
dikehendaki.
2.3.11. Blur, Sharpen, dan Smugde Tool
Blur Tool digunakan untuk mengaburkan area. Misalnya
digunakan untuk menghilangkan bintik-bintik pada wajah. Sharpen Tool
merupakan kebalikan dari Blur Tool. Dengan Sharpen Tool, gambar akan
menjadi lebih tajam. Smugde Tool digunakan untuk mengubah bentuk gambar
dengan cara drag mouse.
2.3.12. Dogde, Burn, dan Sponge Tool
Dogde Tool digunakan untuk membuat area menjadi lebih
terang. Burn Tool digunakan untuk mempergelap area. Spong Tool
digunakan untuk mencerahkan (saturate) atau mengurangi warna
(desaturate).
BAB III – PERMAINAN WARNA
3.1. Sekilas mengenai warna
Warna apapun dapat dinyatakan dalam tiga warna dasar
(RGB) yaitu merah, hijau, dan biru. Cara menyatakan warna yang lain
adalah dengan mode HSL yaitu Hue, Saturation, dan Lightness. Mode lain
adalah CMYK (Cyan, Magenta, Yellow, Black).
Pada bab ini akan dibahas mengenai permainan warna,
mulai dari mengatur latar belakang gambar, membuat gradient, mengatur
brightness & contrast, dan masih banyak lagi tool-tool yang menarik.
Pada subbab selanjutnya Anda dapat langsung praktek dengan didampingi
instruktur.
3.2. Paint Bucket Tool
Paint Bucket Tool digunakan untuk mengganti
background yang memiliki warna sama atau mirip. Background dapat diganti
dengan pattern.
3.3. Gradient Tool
Gradient tool digunakan untuk menghasilkan warna
gradasi. Jangan lupa lakukan seleksi terlebih dahulu bagian mana yang
akan diisi warna gradasi. Jika tidak, maka seluruh kanvas terisi dengan
gradasi.
3.4. Brush Tool
Brush Tool digunakan sebagai kuas dalam mengambar
dengan mouse. Atur besar kecilnya brush, hardness, opacity, dan flow.
Bush Tool dapat juga bekerja pada mode Air Brush.
3.5. Brightness/Contrast
Brightness digunakan untuk mengatur kecerahan gambar.
Contrast digunakan untuk mengatur ketajaman gambar. Gunakan menu Image
-> Adjustment -> Brightness/Contrast.
3.6. Level
Level berfungsi mirip dengan Brightness/Contrast
namun lebih fleksible karena warna dapat diatur warna gelap, warna
menengah, dan warna terang. Level dapat bekerja pada selection atau
seluruh kanvas. Gunakan menu Image -> Adjustment -> Level.
3.7. Curves
Curves bekerja seperti level, namun Anda mengatur
warna RGB dalam bentuk curva. Gunakan menu Image -> Adjustment ->
Curves. Curva dapat diatur otomatis, mode RGB atau diatur
sendiri-sendiri untuk tiap-tiap warna.
3.8. Color Balance
Melalui menu Image -> Adjustment -> Color Balance kita dapat mengatur keseimbangan warna.
3.9. Photo Filter
Photo filter digunakan untuk memberikan filter pada
gambar. Mirip seperti filter yang diletakkan di depan lensa kamera.
Gunakan menu Image -> Adjustment -> Photofilter.
3.10. Replace Color
Replace Color digunakan untuk mengganti warna
tertentu dalam gambar, sedangkan warna yang lain tidak ikut berubah.
Misalnya untuk mengganti warna apel dengan tanpa mengubah warna
background. Gunakan menu Image -> Adjusments -> Replace Color.
3.11. Hue/Saturation
Hue/Saturation digunakan untuk mengganti warna pada
keseluruhan gambar/seleksi. Hue adalah warna, sedangkan Saturation
adalah tebal/tipisnya warna. Gunakan tool ini melalui Image ->
Adjustment -> Hue/Saturation. Perubahan warna dapat diatur pada
chanel master, atau tiap-tiap warna.
3.12. Match Color
Match Color akan menyamakan warna gambar source
kepada gambar yang akan diubah. Misalnya di sini akan diubah gambar
danau3.jpg, menjadi suasana matahati terbit seperti gambar acuan.
Gunakan tool ini melalui menu Image -> Adjustment -> Match Color.
BAB IV – TEKS DAN VEKTOR
4.1. Horisontal Type Tool
Horisontal Type Tool digunakan untuk membuat teks secar horisontal. Hasil teks dapat dipindahkan dengan Move Tool.
4.2. Horisontal Type Mask Tool
Horisontal Type Mask Tool digunakan untuk menyeleksi dalam bentuk teks.
4.3. Pen Tool
Peen Tool digunakan untuk membuat garis lurus dan
garis lengkung dalam bentuk vektor. Klik sekali untuk membuat anchor
point, kemudian jika kurva telah terbentuk, drag anchor point untuk
membuat direction point. Path yang dibuat oleh Pen Tool dapat diubah
menjadi selection.
4.4. Rectangle, Ellipse, Poligon, dan Custom Shape Tool
Tool ini berguna untuk menghasilkan bentuk kotak
(rectangle), ellips, poligon, dan berbagai macam bentuk lain yang telah
disediakan oleh Adobne Photoshop. Bentuk-bentuk tersebut misalnya hati,
lampu, not balok, dan lain sebagainya.
BAB V – LAYER, MASK, DAN STYLE
5.1. Memahami Layer
Layer adalah lapisan tembus pandang. Bagian yang
tidak bergambar pada sebuah layer bersifat transparan. Layer dapat
ditumpuk dan diatur susunannya. Dengan menggunakan layer, efek-efek akan
berlaku dalam layer tertentu saja, tanpa mengganggu layer yang lain.
5.2. Quick Mask Mode
Quick Mask Mode digunakan untuk menyeleksi dengan
menggunakan Brush Tool. Aktifkan tool ini dengan menekan tombol Q pada
keyboard atau memilih tool Quick Mask Mode.
Pada contoh ini, gambar beruang di seleksi dengan
menggunakan Brush Tool pada mode quick mask. Setelah gambar beruang
terseleksi, kembalikan ke mode normal untuk menghasilkan seleksi gambar
beruang.
5.3. Layer Mask
Layer Mask digunakan untuk menyembunyikan bagian
tertentu pada layer. Gunakan warna hitam untuk menyembunyikan gambar dan
warna putih untuk menampilkan gambar.
5.4. Layer Style
Layer Style merupakan teknik memberikan efek tertentu
pada suatu layer. Pilih tool Add Layer Style yang ada pada sudut kanan
bawah pallete.
BAB VI – EFEK KHUSUS PHOTOSHOP
6.1. Filter Liquify
Filter Liquify dapat mengubah gambar secara langsung
dengan menggunakan mouse. Misalnya memperbesar/memperkecil mata,
menggeser alis, dan sebagainya. Filter ini dapat digunakan melalui menu
Filter -> Liquify.
6.2. Filter Vanishing Point
Filter Vanishing Point digunakan untuk meng-klone
gambar dalam bentuk perspektif. Filter ini dapat digunakan melalui menu
Filter -> Vanishing Point. Area sumber kloning ditentukan dengan
menekan Alt + Click. Fitur merupakan fitur baru dalam
Adobe Photoshop CS2.
6.3. Filter Blur
Filter Blur digunakan untuk mengaburkan gambar. Yang
menarik dalam filter ini adalah mengaburnya gambar dapat dibuat secara
radial. Gunakan filter ini melalui menu Filter -> Blur.
D1NU Co,Ltd